
I’ll be honest. As a developer, I definitely get a little keyed up when one of our clients lets us know that they are about to have a major sale or a major funding event that will bring a short-term, but potentially eye-popping spike of traffic to their website. Should I have spun up another server or 4? What will page load times look like? Will the site go down during the sale or event? What is our plan if it does?!
For years I lived with it and most of the time everything went well. After all, I thought “We took the time to minify and compress our assets as much as possible, we’re serving right-sized/lazy-loaded images, we made sure our MySQL queries aren’t overly numerous or taxing, we implemented server-side caching, and did our best to choose appropriately sized hosting. We’re covered, right?”
But every now and again, something wouldn’t go right. We’d see a RAM/CPU spike and BOOM – a site would go down or become unstable at the most inopportune time.
Enter the Content Delivery Network
Over the years, we’ve gradually increased our use of Content Delivery Networks or CDNs for our clients as they have become more affordable, easier to configure, and easier for our clients to flush cached assets without our intervention. It has served something of an anti-anxiety elixir. To help us sleep easier we started by:
- Serving static assets such as images, stylesheets and Javascripts by way of Cloudflare/CloudFront.
- Always using tools like Automattic’s “WP Super Cache” plugin to optimize our make it easier on our servers to serve up content.
- Making sure that our expires tags were set appropriately so that static assets were cached on our users’ devices.
Still one step short…
All of this is incredibly important, but none of these things help us if the origin server goes down. After all, static assets aren’t worth much if there is no HTML to go with it! You’ll still get those ugly 5XX errors that result in a flurry of 4-letter words.
Then in 2016, Sean and I attended a talk at Smashing Conference that changed our way of thinking and introduced us to something Mathias Biilmann called the JAM Stack (Javascript, APIs, Markup). Biilmann argued, in short:
With a few exceptions, if you look at just about any site, the markup of most pages is not changing very often, and even if it is user-specific or dynamic, it’s typically limited to a few components. It seems silly to go through the process of rendering this same markup from scratch on every request.
This made us ask, what can we do to serve the HTML via CloudFront/Cloudflare, all while using the tools our clients love such as WordPress? Essentially we’d have a win-win-win:
- Cheaper Hosting: Because we can avoid hosting our site on behemoth sized-servers or spinning up multiple servers on load balancers. (Delivering content via CDNs is cheaper)
- Faster Delivery: CDNs are going to blow away a singular server when it comes to response time and delivery because CDNs deliver content via a distributed network (reduced latency because the asset can be served from a node closest to the user).
- “Always Online”: Even if the server has a hiccup or ten, most (or all) of the site will still stay live because the page is cached on the CDN. And because good CDNs are hosted on a distributed network, even if one node goes down, we’re still afloat.
- And I’ll add a fourth, sleeping well at night.
In this two-part blog series, we’re going to look at the following:
- Using Cloudflare with a WordPress site to leverage HTML caching.
- Configuring CloudFront (Amazon) to deliver content via CloudFront from a site running on an EC2 Instance.
Importantly, we’re using WordPress here by way of example, but most other CMSs such as Craft, Magento can be used in this manner with a little elbow grease. For static sites or those output from static site generators such as Jekyll or Hugo, we (especially Sean!) are huge fans of Netlify.
Why is a CDN important?
Let’s break down where we’ve been to understand why CDNs are so beneficial.
Traditional Setup
Not all that long ago, most sites were set up as a simple relationship between a server and a user. In this setup each request from the user goes to the server and it must respond to each and every one. Importantly, just about every page on the internet requires several requests to perhaps several hundred (I’m looking at you, Magento 2) to render. You can imagine the server scrambling desperately like a plongeur in a busy french restaurant during a traffic spike.
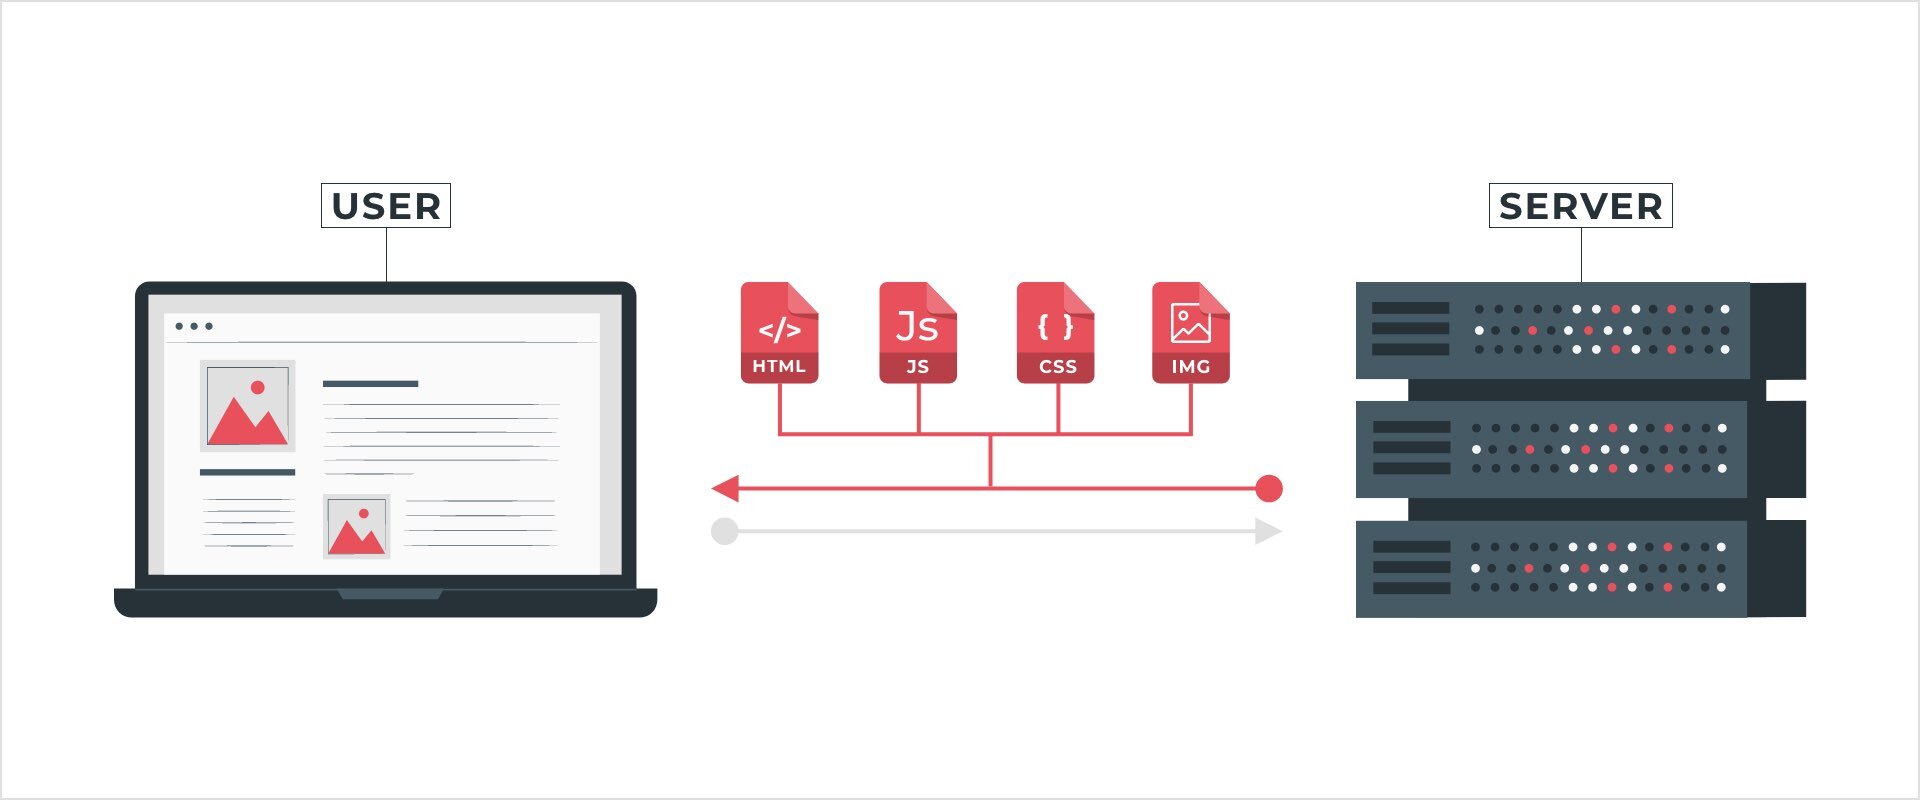
Unless you have a large server, you’re just asking for trouble with any significant traffic spike. Setting EXPIRES headers with far out expiration dates and implementing full page caching are significant improvements, but we can do better by our servers.
OFFLOADING static assets
An easy, but huge win is to offload all static assets to a CDN. When we refer to “static assets,” we mean anything that is not going to change based upon the user that is visiting. Images, video, fonts, stylesheets and Javascript generally fall into this bucket. Further, because these assets comprise the heaviest part of the payload to render the page, we are already far more equipped to handle higher traffic without breaking a sweat.
How does it work?
Most CDNs like Cloudflare and CloudFront work as follows:
- The User’s machine requests an asset such as an image or font file.
- The request is routed through the CDN instead of directly to the server.
- If the asset exists and has not expired, the CDN will respond to the user with the asset (i.e. response never goes to the server).
- If the asset does not exist OR has expired, the CDN will forward the request to the server, but will store the asset for the next time someone asks for it (unless it is told specifically not to store it — more on that later).
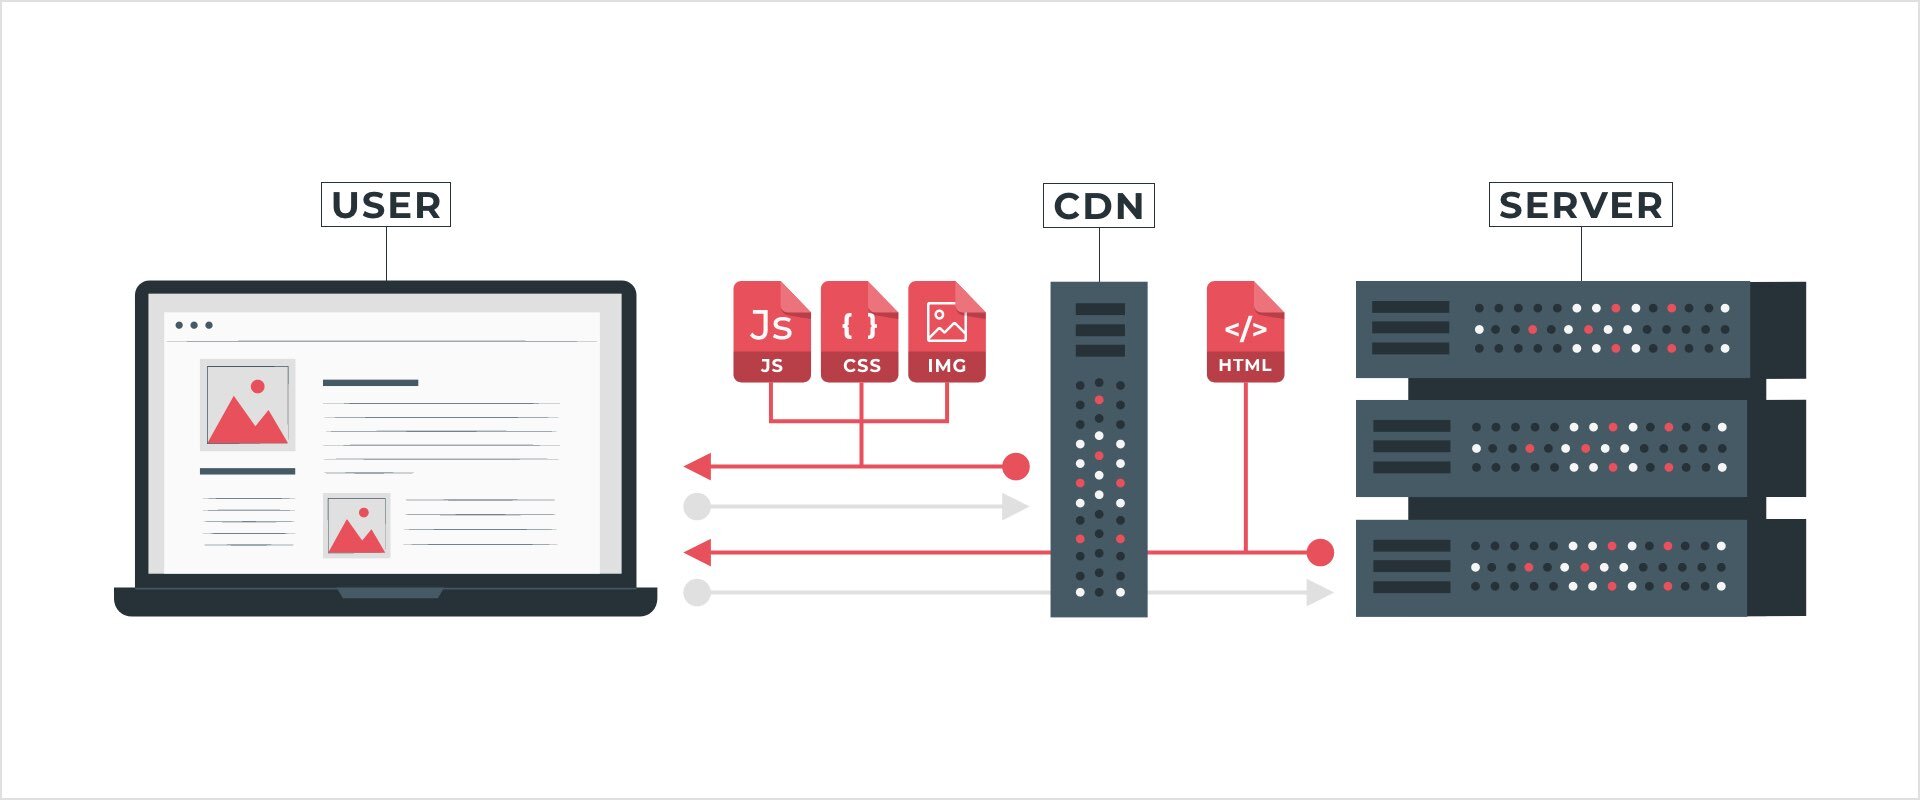
Now combine this with full page caching, and we’re at a solid “B+.” But to really sleep well at night, let’s go one step farther and cache the HTML as well.
CloudFlare + WordPress

Cloudflare has been around since 2009 but it really started to gain traction recently with a lot more attention from Podcasts and developers (us included!).
In order to follow this tutorial you’ll need the following:
- A Cloudflare Account
- The free plan is fine in most cases, although the next level up provides some really nice features such as Polish which can serve your images as WebP if your user’s browser supports them.
- A server with a running instance of WordPress
- Ability to set your domain’s Name Server (usually at your Registrar) to point to Cloudflare.
Initial Configuration
Step 1: Account Creation & DNS RECORD SETUP
To start, head over to Cloudflare and register your new site by clicking “Add Site” (we’ll assume the free plan to start).
At this point, Cloudflare will scan your DNS records and set them up for you. Always double-check everything; we’ve rarely had incorrect records, but occasionally one or two may be missing, (especially TXT records).
Important Note: If this is a site that is already live, you may wish to change “Proxied” to “DNS Only” (so-called “gray clouding”) so that we can set up our certificate for end-to-end encryption with minimal disruption. “Gray clouding” will pass along the request as usual without any intervention by Cloudflare.
External services should generally be set to “gray cloud” as well so as to not disrupt any services. Records like MX records and TXT records will automatically be set to “DNS Only.”
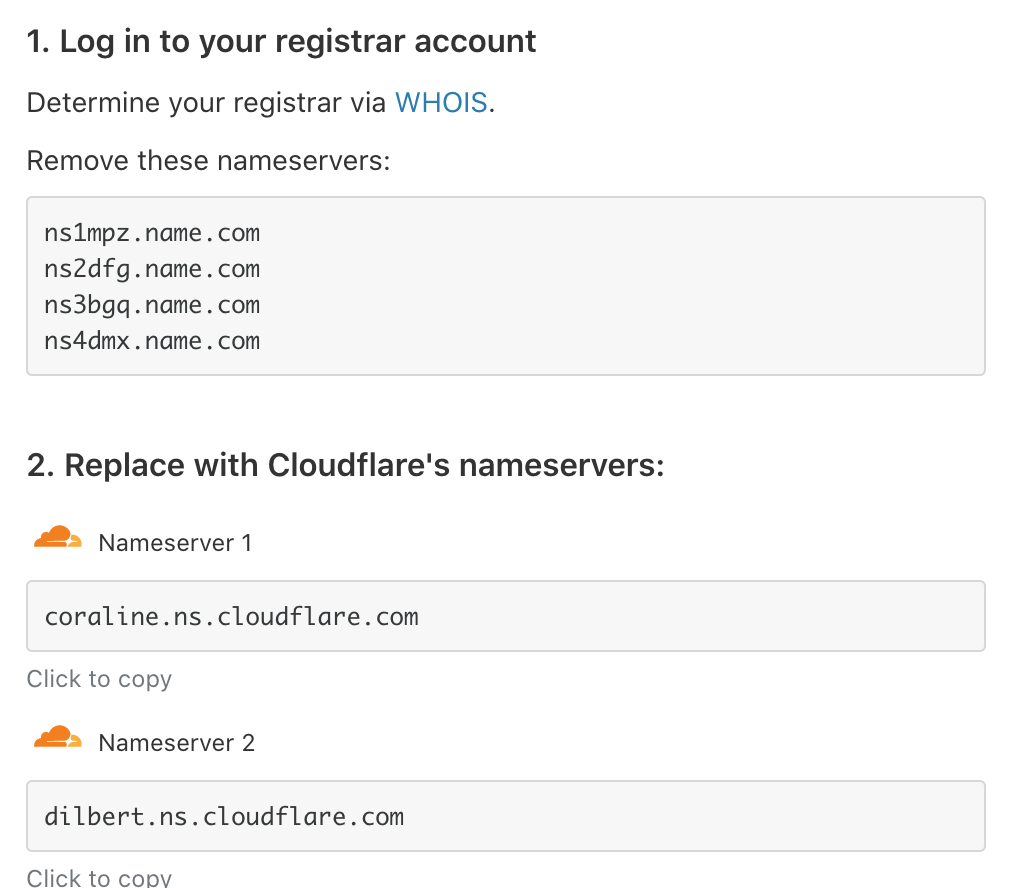
Step 2: CHANGE YOUR NAME SERVER
After clicking “Continue,” you will be instructed to update your name servers to Cloudflare as shown in the below example. Depending upon your registrar, this change may take up to 24-72 hours but is usually faster. At this point you can check your name servers; if they new records have propagated, Congratulations! Your web traffic is successfully being routed through Cloudflare. Now let’s get to work!
Step 3: Set up End-To-End Encryption
End-to-end encryption allows a secure connection from the user’s machine to Cloudflare and subsequently to your origin server.
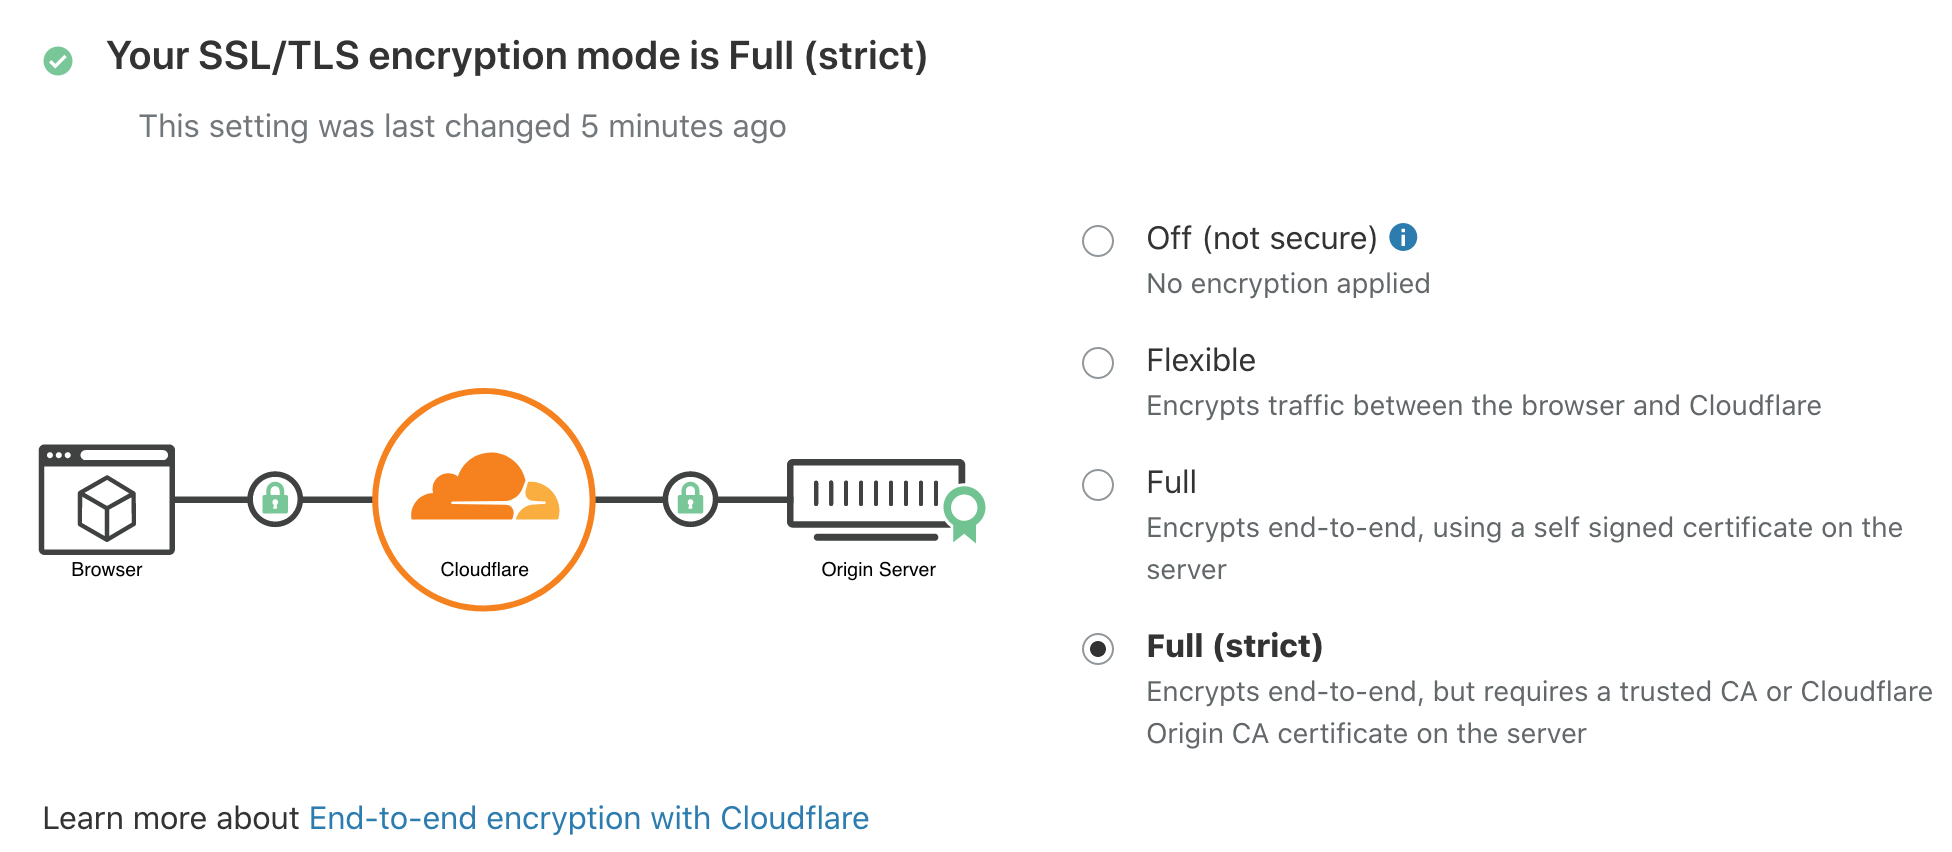
While the last element (a secure connection between Cloudflare and your server) is optional, we always implement end-to-end encryption to be safe. This is the only part of the process that may create some downtime.
For the User-to-Cloudflare connection you have the following options:
- Utilize a universal SSL through Cloudflare.
- Purchase a cert through CloudFlare specific to your domain(s), or
- Upload your own SSL.
- Uploading your own certificate is only available on the Business Plan which runs $200 USD per month at the time of writing.
For the purpose of this tutorial, we’re going to roll with option 1 and is the option we use most frequently.
For the Cloudflare-to-Origin Server connection, you have two options:
- Use a Self-Signed Certificate
- Use a trusted CA or Cloudflare Origin CA certificate.
We almost always use a Cloudflare Origin CA Certificate and will do so in this tutorial.
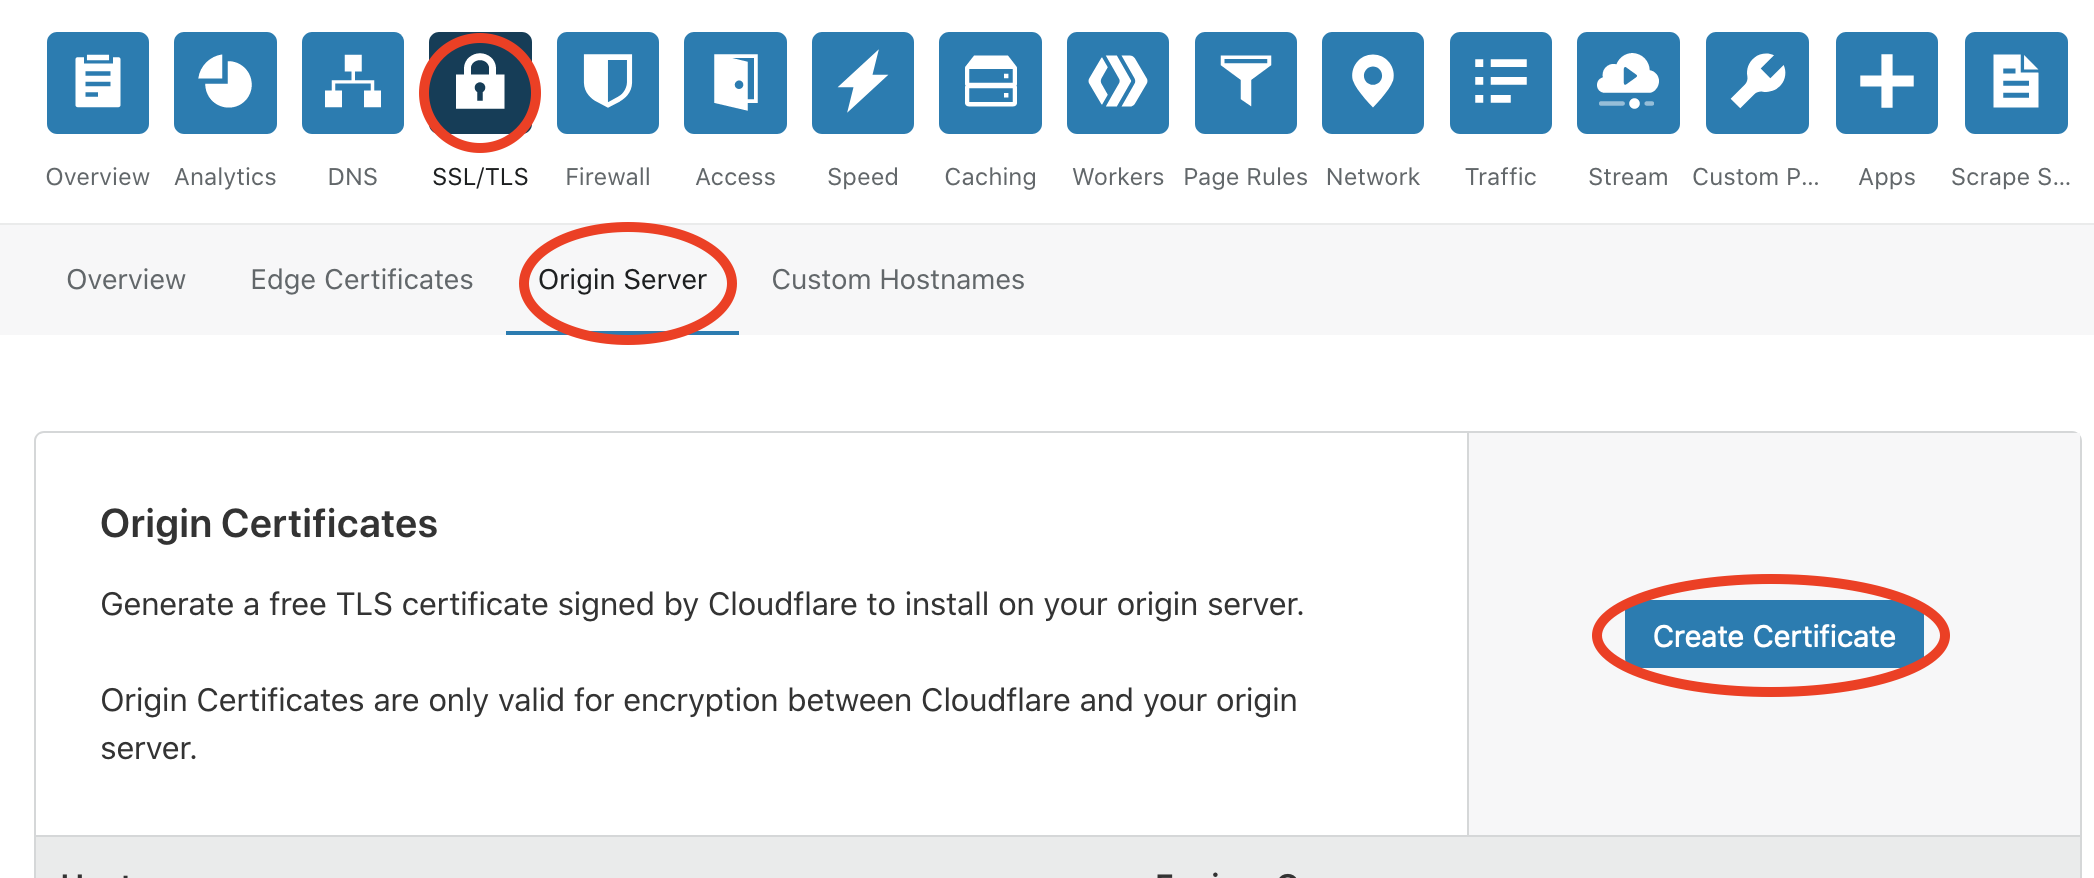
We generally allow Cloudflare to generate our private key and CSR and also add a “*.” in front of our domain so if we set up any subdomains in the future, we can use the same certificate.
Download your certificate and install it on your server. For a moment, users will get a certificate warning when they go to your site. To resolve this, go back to the DNS settings in Cloudflare and change the “DNS Only” setting on your main domain to “Proxied.”
At this point, you will have end-to-end encryption in place and we are ready to set up our caching.
*Note: You may want to wait until the DNS fully resolves (i.e. 24-72 hours) to prevent SSL errors for users that are not yet routed through Cloudflare. As such, we make the DNS switch at least a few days in advance of a launch to avoid these problems.
caching configuration: To Plugin or not to plugin
Prior to mid-2020, we typically set up page caching on Cloudflare without a plugin and you still do not need one. However, in many cases we’ve started using WP Cloudflare Super Page Cache on many of our sites. This plugin is actively maintained and offers the following features that can make it much easier on our clients:
- Automatic cache invalidation when a post, page or custom post type is changed (including archive and category pages)
- The ability to easily flush the cache from your WordPress admin
- Adds a query string to all requests when logged in as an administrator so you aren’t seeing a cached version of the page when making edits
- Integrations with a number of other plugins that can assist with sending proper cache headers and decrease the likelihood of needing to go to the Pro plan.
We will walk through setup without using a plugin so you can see how the special sauce is made. Even when using the aforementioned plugin, it is important to understand what’s going on if you ever need to debug a problem.
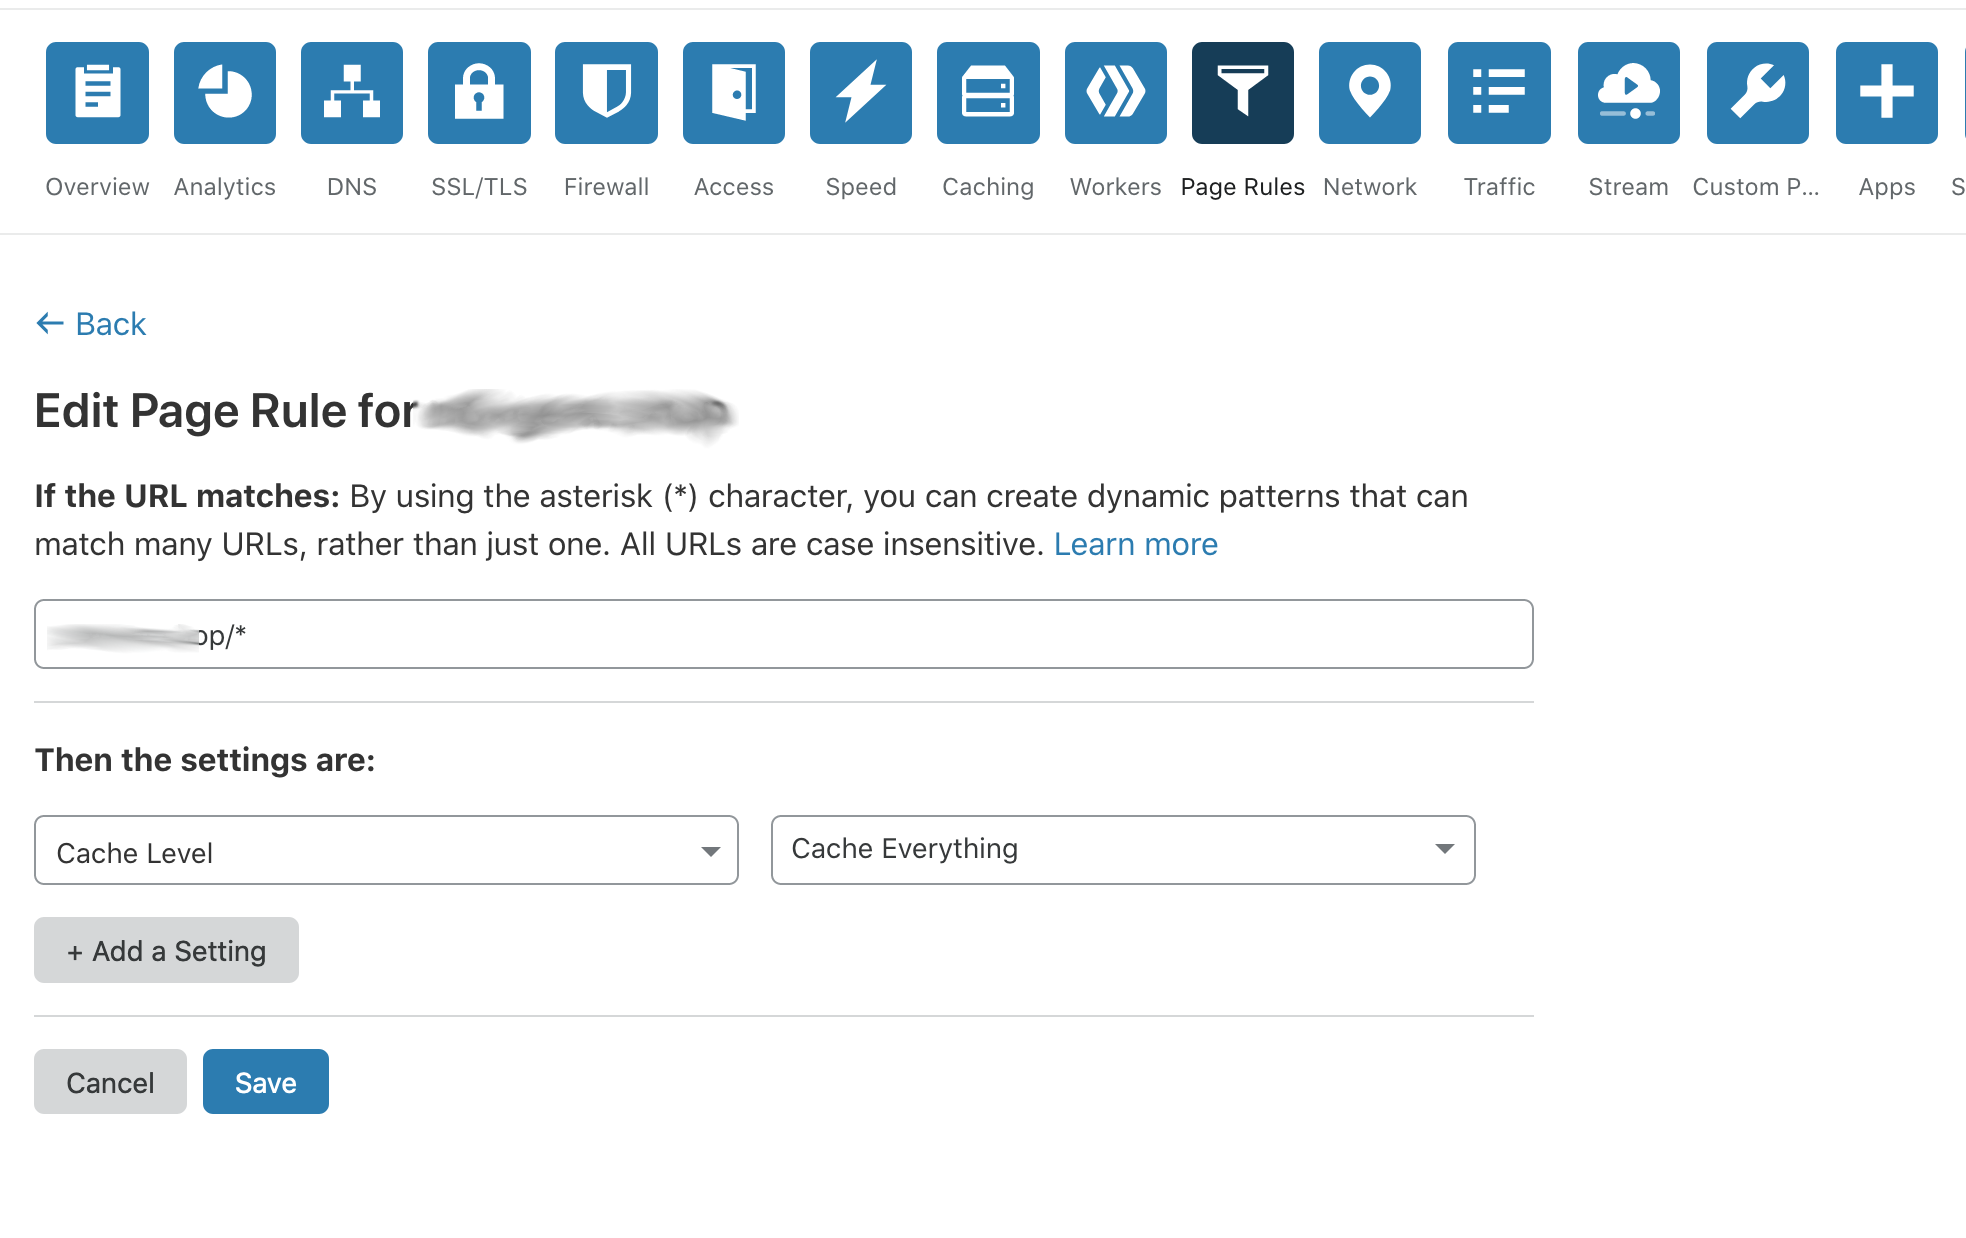
SET THOSE PAGE RULES
By default, Cloudflare does NOT cache HTML. So we need to change that behavior. First, head over to “Page Rules” and enable caching as shown in the screenshot below. To start, cache everything. For you on-point individuals thinking, “What about user-specific content like carts or account pages?!” Don’t worry, we’ll get to that!
Let’s hit our site with a curl request to see where we stand. curl -I YOUR_URL will allow us to just view the headers.
$ curl -I https://some-site.com
HTTP/2 200
...
cache-control: max-age=14400
...
expires: Sun, 23 Aug 2020 04:26:57 GMT
cf-cache-status: EXPIRED
If you were to run this curl request again, you should see the cf-cache-status change to “HIT” and the expiration date should stay the same.
$ curl -I https://some-site.com
HTTP/2 200
...
cache-control: max-age=14400
expires: Sun, 23 Aug 2020 04:26:57 GMT
cf-cache-status: HIT
age: 3
The response headers from the second request tells us that:
- Our page is successfully being cached and served via Cloudflare.
- The page will be cached for 14400 seconds, or 4 hours before it is retrieved form the server again.
- The age of the page on Cloudflare is 3 seconds.
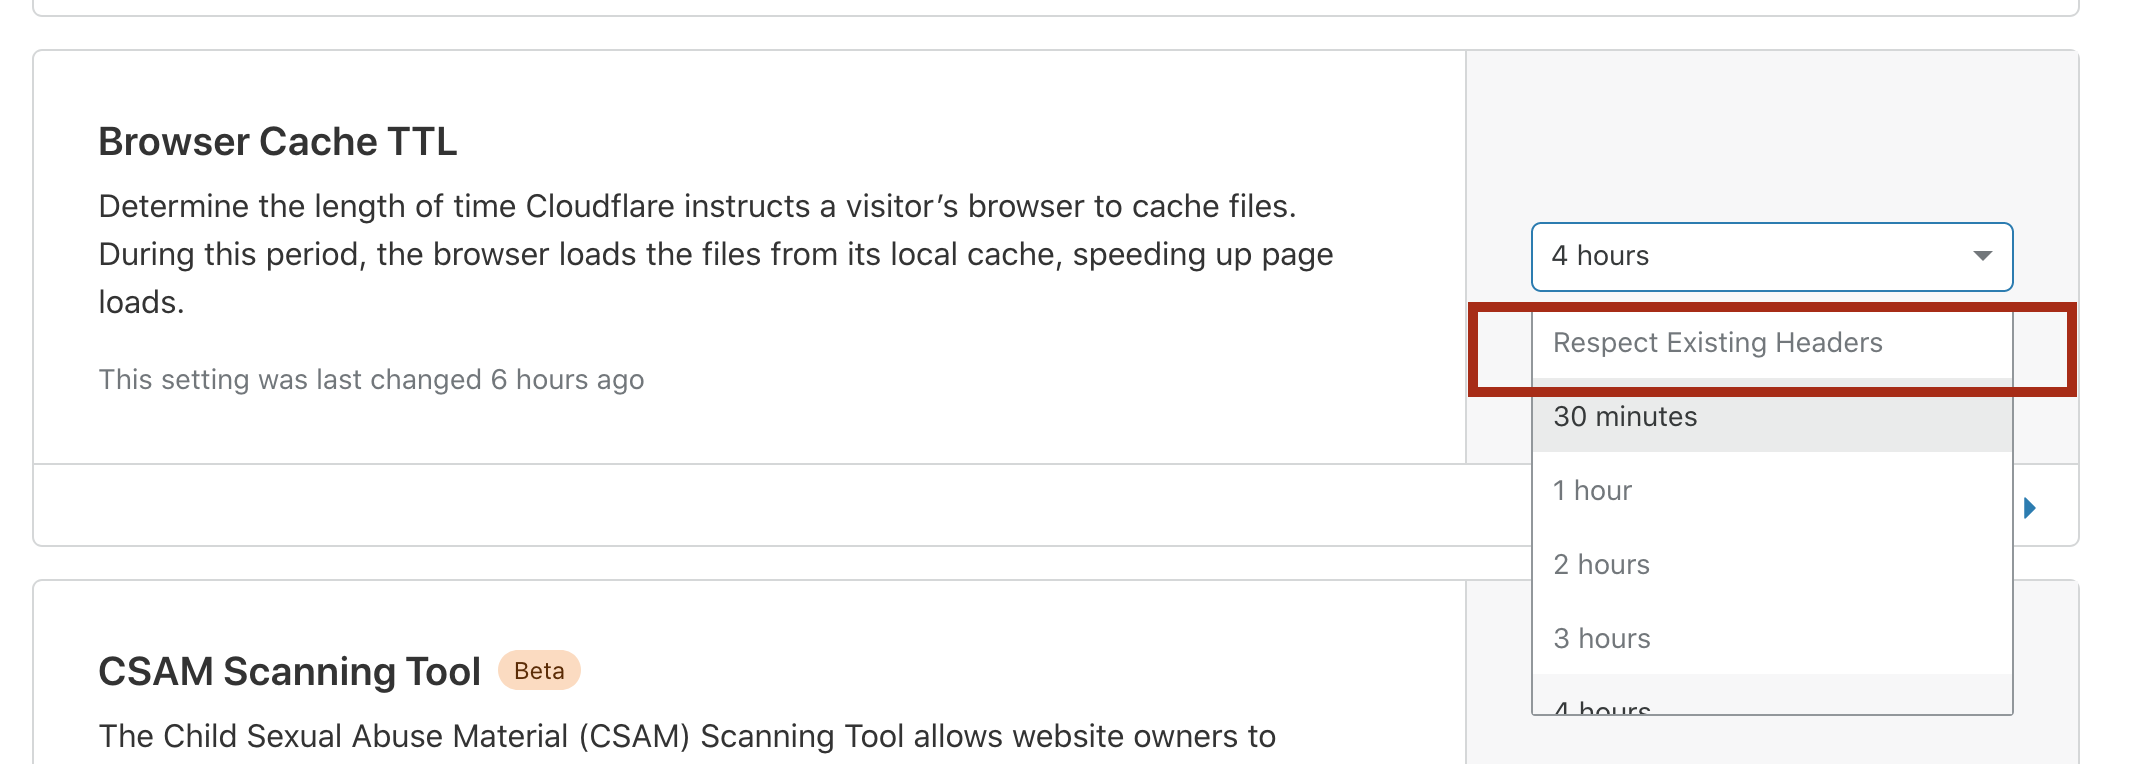
LET THE SERVER SET THE RULES
Next head over to the caching tab.

Scroll down to the Browser Cache TTL setting. As you can see in the screenshot below, this is from where our “4 hours” or “14400 seconds” cache duration is derived. (Cloudflare will use this value or the value sent from the server, whichever is longest). This is extremely important. We’re going to change this to “Respect Existing Headers,” so that Cloudflare uses whatever our server sends back.
Home stretch! Next, let’s establish default expires headers for our content. For a template, we still love the HTML5 Boilerplate htaccess file. As a way of example, let’s add this snippet to our .htaccess file (assuming you are using Apache):
Hopefully the power of this is becoming clear; we are starting to gain finer-grained control over how our content is cached. In this case, we’re setting the way different data types are cached. Our CSS is good for a year; our HTML is good for an hour. Let’s purge our Cloudflare cache and try that curl request again.
As you can see, our HTML document is now only cached for an hour (3600 seconds). In the example above – we have set JSON and XML documents to cache for 0 seconds (or expire instantly).
$ curl -I https://some-site.com
HTTP/2 200
date: Sun, 23 Aug 2020 03:50:10 GMT
...
cache-control: max-age=3600
expires: Sun, 23 Aug 2020 04:50:10 GMT
cf-cache-status: EXPIRED
Most WordPress page/post requests do not send max-age cache headers and instead leave it up to the server, so any run-of-the-mill post or page will be cached according to the settings above.
Dynamic Pages
This is great for most pages, but not all. For shopping carts, checkouts and account pages, this would be a major problem! (Imagine if a user visited his or her account page and another user visited the page with the same URL and saw another user’s account information!)
Thankfully, many plugins such as WooCommerce send the following headers for pages like carts and checkout:
$ curl -I https://some-site.com/cart
HTTP/2 200
date: Sun, 23 Aug 2020 04:01:01 GMT
expires: Wed, 11 Jan 1984 05:00:00 GMT
cache-control: no-cache, must-revalidate, max-age=0
...
cf-cache-status: EXPIRED
As we can see, max-age is set to 0 seconds and Cloudflare is told not to cache the request. In addition, the Expires header is set to a date well in the past so the user’s browser knows to re-fetch this content each time the page is loaded. While plugins like WooCommerce handle these headers properly, it’s important to double-check any dynamic page. In a later blog post, I’ll show you how you can send these custom headers on any page or request using WordPress hooks.
If you have additional page rules available, this can also be handled within Cloudflare on the “Page Rules” page by doing something like this:

$ curl -I https://some-site.com/tracer360/
HTTP/2 301
date: Sun, 23 Aug 2020 04:09:38 GMT
...
cf-cache-status: DYNAMIC
Note that the cache type in this case is set to “DYNAMIC,” meaning that Cloudflare recognizes this as a dynamic page and it should not be cached.
the result
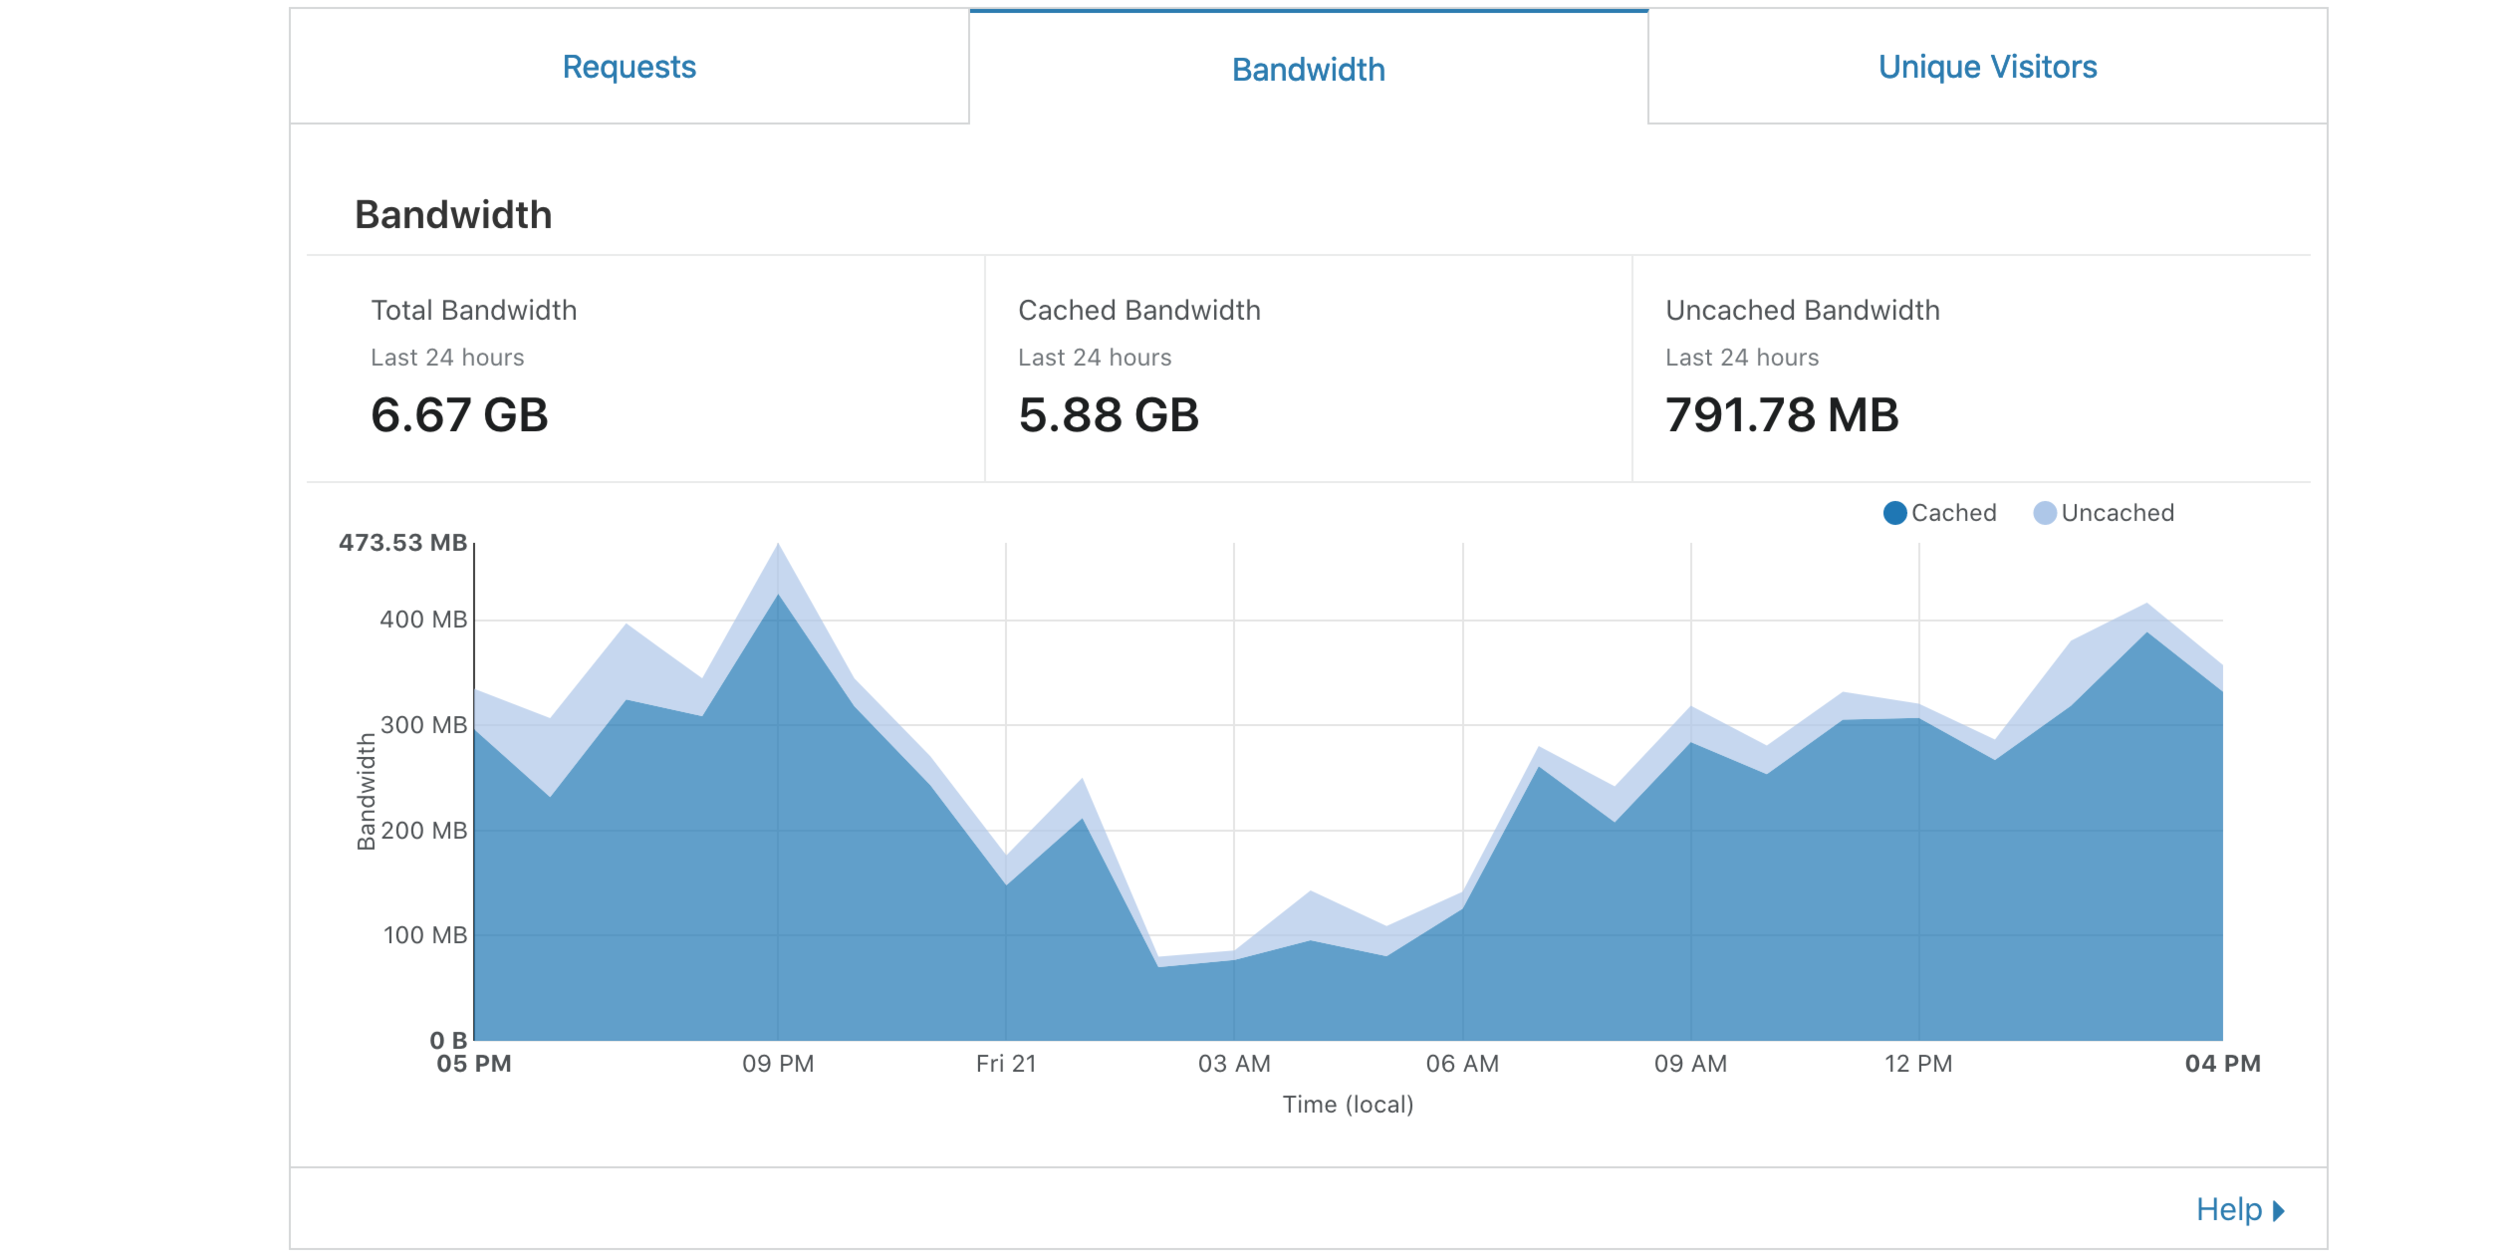
Our server is now in a much better position to handle surges. Take a look at a fairly high-traffic WooCommerce store using the configuration above. The server is essentially only handling only the things it needs to handle such:
- Cart Requests
- Checkout Requests
- Account Page Requests
- Ajax requests (to load the mini-cart), check coupon codes, etc.
- A few API requests to populate dynamic content on the page
- Pages that have expired.
As you can see, about 85-90% of the traffic is handled by Cloudflare… and our server thanks us for that.
A FEW ADDITIONAL NOTES
Caching as a WordPress Admin
When we first started using Cloudflare, we were worried that Cloudflare would cache our requests when we were logged in as admins but thankfully, this doesn’t happen; the no-cache & max-age=0 headers are passed by WordPress when we are logged in as you can see below.
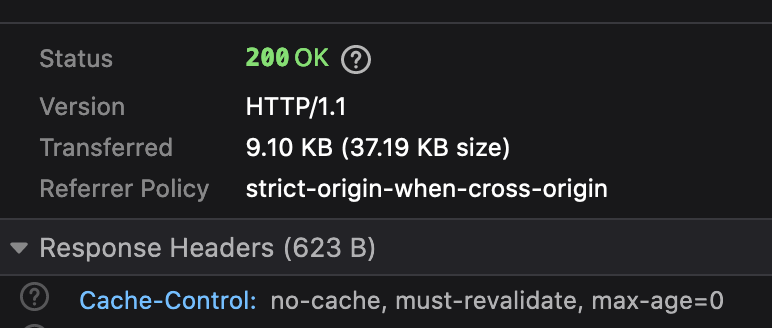
However, what is important to know is that if you visit a public-facing page while logged in, you will not see the familiar admin bar at the top of your page if that page has already been cached by Cloudflare (i.e. a non-logged in visitor has visited the page). The aforementioned WP Cloudflare Super Page Cache plugin appends a query string to the end of all URLs when logged in so as to avoid this problem.
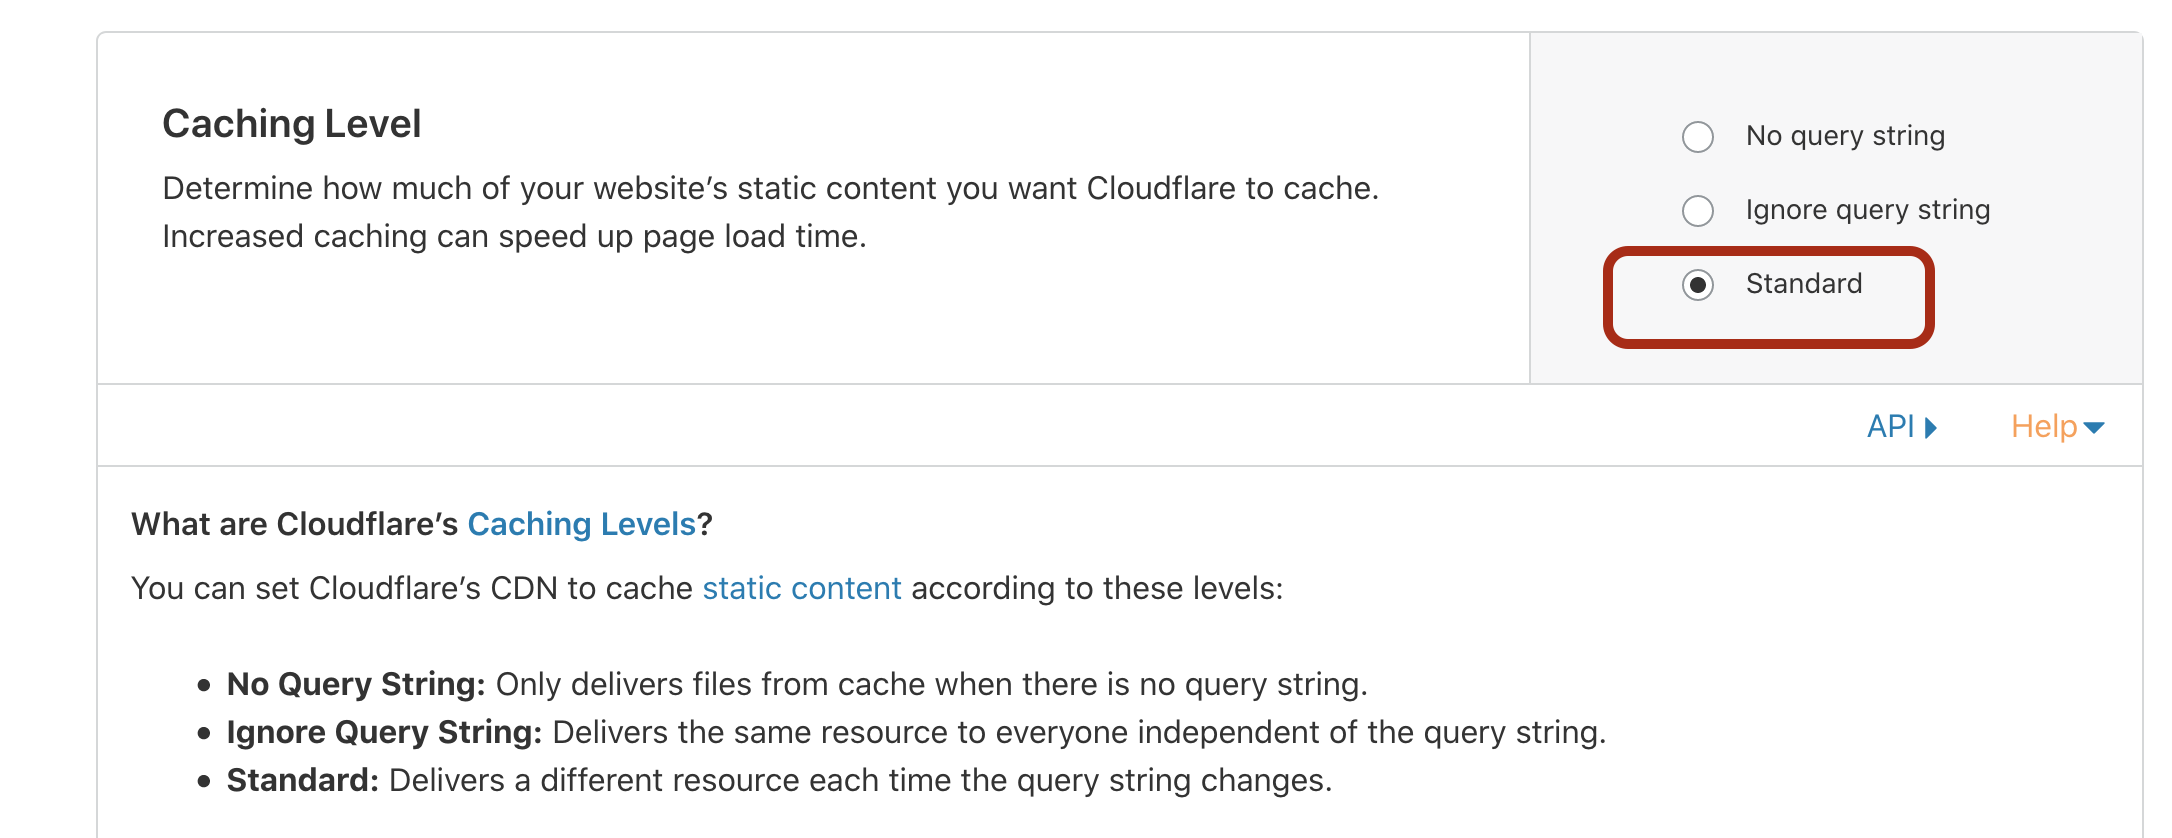
CSS and JS Versinoing
As a developer, updating Javascript and CSS is a way of life. While we want long expires tags on our CSS/JS, we also don’t want to make it difficult to update these assets. On the Cloudflare side, we need to set our Caching Level to “Standard” as shown in the screenshot below because we want Cloudflare to “deliever a different resource each time the query string changes.”
In our theme, we do something like this when enqueueing our scripts and styles:
The beauty of this is that each time we compile or update our CSS, the query string will change thereby automatically, thereby invalidating our old version as you can see below:
https://my-site.com/wp-content/themes/ope-wp/assets/styles/main.css?ver=1598125502Do I still need a caching plugin?
We always used WP Super Cache prior to putting sites on Cloudflare or Cloudfront. However, with a CDN, it is not necessary if you are caching HTML for lengthy periods of time. Beyond unnecessary, we argue that it is redundant and makes it more confusing when you are clearing your cache.
Note: The “WP Cloudflare Super Page Cache” plugin we mention above will give you the option to cache a static version of the page on your server and automatically clear this cache when you clear the Cloudflare cache. This reduces the burden on your server by not regenerating the page as different nodes of the CDN hit your server for the first time.
need help?
While we love geeking out on all of this stuff, we realize that not everyone does! If you want the peace of mind, security and speed that you can have with your site behind a CDN like Cloudflare, please reach out to us and we’d love to help!